A 6-Step Sampling Journey for a Custom Canvas Tote Bag
Jul 02, 2026
After years of working in OEM bag manufacturing, we've received all kinds of inquiries. Some clients send us an existing sample bag, some provide a detailed technical specification document spanning dozens of pages, while many simply send a hand-drawn sketch or a product rendering.
To be honest, the latter two are the most challenging. Every line and every color block in a drawing often represents expectations that the client hasn't explicitly stated. And it's precisely those unwritten details that determine whether the final bag will truly meet the client's vision.
Hand sketches and renderings usually only illustrate the overall appearance and color scheme. Critical details such as fabric stiffness, hardware specifications, closure methods, and construction techniques are often left unspecified. These elements need to be clarified, analyzed, and confirmed step by step through communication. Even a small misunderstanding can result in a finished product that differs significantly from what the client originally envisioned.
Recently, one of our clients wanted to develop a custom canvas tote bag for their brand. The only reference they provided was a single product rendering. The design featured the brand logo printed on the front panel, relatively short handles, a structured canvas body, matching metal feet attached to the bottom of the bag, and a highly functional interior with multiple organizational compartments.
How many steps does it take to turn this design into a physical sample?
Today, we'd like to walk you through the entire process, step by step, to give brands looking for an OEM manufacturing partner a clear understanding of how many stages a seemingly "simple" canvas tote bag must go through before it becomes a finished sample.
Table of Contents:
Step 1: Confirming the Fabric Specifications and Color
Step 2: Creating the Paper Pattern
Step 3: Cutting Materials and Producing the Structural Sample
Step 4: Designing the Logo Artwork
Step 5: Confirming the Hardware Components
Step 6: Final Sample Approval
Step 1: Confirming the Fabric Specifications and Color
Fabric Specification: 14–16 oz Canvas
The ounce (oz) is the standard unit used to indicate the weight of canvas fabric. Generally speaking, the higher the ounce, the denser and heavier the fabric, resulting in a thicker and more structured finished bag.
For this project, we recommended 14–16 oz canvas. Tote bags made from canvas within this weight range have excellent structure, allowing them to stand upright without easily collapsing or losing their shape. At the same time, the fabric is not excessively heavy, so it won't add unnecessary weight to the bag itself, making it well suited for everyday commuting and daily use.
That said, every brand has its own preference for how structured a bag should feel. To ensure the final product matched the client's expectations, we first sent them a set of fabric swatches in different weights. After comparing and feeling the materials in person, the client confirmed 16 oz canvas as the preferred choice.
Fabric Color: A "Premium Gold"
The client's color request sounded fairly straightforward—a premium-looking gold.
However, "straightforward" doesn't necessarily mean "simple."
After handling countless similar projects, we've learned that the biggest challenge often lies in the details. Fabric specifications can be standardized, but color perception cannot.
The "gold" the client sees on an Apple display may appear as a bright metallic gold, while on another monitor it may look like a muted gold. Even on the same screen, different brightness settings can produce noticeable color variations.
To accurately match the client's vision of a premium gold, we prepared four canvas color swatches in different shades—Bright Gold, Matte Gold, Classic Gold, and Brown Gold—and labeled them #1, #2, #3, and #4 for easy reference.
After sending photos for an initial review, we shipped the selected physical swatches to the client so they could compare them in person alongside their brand's visual identity. In the end, they chose Color #2, a refined matte gold with a subtle, sophisticated finish.
This process not only eliminated the risk of disputes caused by differences in color perception after production, but also gave the client a clear understanding of what the final product would look like, providing confidence before sampling moved forward.
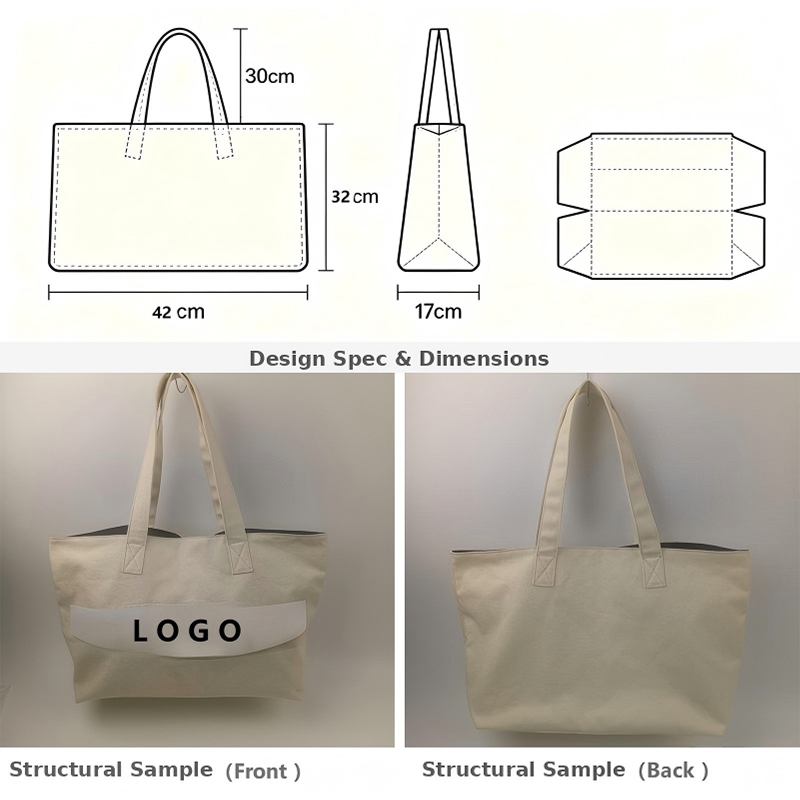
Step 2: Pattern Making
The paper pattern serves as the blueprint of the bag, determining its final dimensions, proportions, and overall structure. Even a difference of just 1 cm can significantly affect the finished appearance. Based on the approximate dimensions shown in the customer's design mockup, we first calculate the base measurements for the bag body, handles, bottom panel, and interior pockets. We then fine-tune the pattern by adjusting the allowances according to the fabric's thickness and stiffness, ensuring the finished tote matches the customer's expectations.
In the customer's artwork, the handles were designed to be relatively short. However, considering that a tote bag is commonly carried over the shoulder, handles of that length would only allow for hand carrying, reducing its practicality. We therefore increased the handle drop from 26 cm in the original design to 30 cm and sent the updated pattern drawing to the customer for approval. After receiving their confirmation, we finalized the pattern details and prepared it for the cutting stage.
Step 3: Cutting & Structural Sample Production
Once the paper pattern is approved, we move on to the cutting stage. Our pattern maker carefully cuts each fabric panel according to the approved pattern, ensuring every piece is accurately shaped. During the process, special attention is paid to the fabric grain direction to prevent twisting or distortion once the bag is assembled.
After all the fabric pieces are cut, we inspect each panel individually to verify that its dimensions match the approved pattern exactly. This careful quality check helps eliminate dimensional deviations and ensures every component is ready for precise assembly in the next stage.
After confirming that all cut pieces are accurate, we carry out a preliminary assembly by stitching the panels together according to the markings on the approved pattern. At this stage, only the basic structure of the bag is constructed—finishing processes such as logo printing, bottom stud installation, and other detailed craftsmanship are intentionally left out.
The result is a structural sample, which is used to verify that the bag's proportions, construction, and overall design perform as expected before moving on to the fully finished sample.
For this custom canvas tote bag, for example, we intentionally left registration marks for the logo printing and pre-assembled all the internal features requested by the client, including the divider compartments and zipper pocket. This allowed the client to clearly evaluate whether the bag had the desired level of structure, whether the handle length was proportionate, and whether the interior layout and storage capacity met their expectations.
Once the structural sample was completed, we immediately photographed it from multiple angles, capturing all the important details, and then shipped the physical sample to the client for inspection. This gave the client a chance to assess the overall look and feel firsthand. If any adjustments were needed, they could be made at this stage, avoiding unnecessary costs and delays that would arise if changes were requested after the entire sampling process had been completed.
Step 4: Designing the Logo Artwork
Once the dimensions of the structural sample were finalized, we created a full-scale (1:1) logo layout based on the actual size of the bag. This allowed us to determine the optimal logo placement and display size before production.
We also refined the logo's line details according to the bag's visual proportions, ensuring that it complemented the overall design. The goal was to strike the right balance—making sure the logo wouldn't appear too small and go unnoticed, nor too large and overwhelm the bag's clean, minimalist aesthetic.
The image shows the 1:1 logo design layout. To protect the client's confidential information, the logo has been blurred.
Step 5: Confirming the Hardware Components
Just like the main body fabric, every hardware component used on the bag must be carefully reviewed and approved to ensure a consistent color palette and overall design aesthetic.
For this canvas tote bag, the primary hardware included matching metal feet on the bottom of the bag, a metal zipper, and other metal accessories.
Although this step may seem straightforward, it often requires considerable attention to detail. Based on the client's selected fabric color, we carefully adjusted and compared different hardware finishes before selecting hardware in a matching metallic tone that complemented the canvas perfectly.
As with the previous steps, we first photographed the selected hardware and sent the images to the client for approval. If necessary, we also included the actual hardware samples together with the structural sample, allowing the client to evaluate the colors and finishes in person before moving forward with production.
Step 6: Final Sample Approval
Once all the key details have been finalized, we move on to producing the complete production sample (pre-production sample). At this stage, the remaining finishing processes—such as logo printing, hardware installation, and final assembly—are completed to create a fully finished canvas tote bag.
Before sending the sample to the client, we carry out a comprehensive in-house quality inspection. We carefully check every detail, including:
Whether the bag dimensions match the approved specifications
Whether the logo size and placement are consistent with the final artwork
Whether the metal feet are securely and evenly installed
Whether the stitching on the interior compartments is neat and well-finished
Whether the handle reinforcement and load-bearing stitching meet our quality standards
Only after confirming that every detail meets the required specifications do we ship the completed sample to the client for final approval.
Once the client receives the sample, they can evaluate it from every perspective—including the overall appearance, feel in hand, functionality, and construction details. If any minor adjustments are needed, this is the final opportunity to make revisions. After the client gives their approval, we proceed with mass production, ensuring that the bulk order is manufactured according to the approved sample.
After completing these six steps, a custom canvas tote bag that began as nothing more than a design rendering has successfully gone through the entire sampling process—from concept to physical prototype.
While this step-by-step approval process may seem time-consuming, each stage plays a crucial role in minimizing risks later in production. By carefully confirming every detail along the way, we ensure that the final product faithfully reflects the client's original vision and is delivered exactly as expected.
FAQ
Q1: How long does it take to develop a custom tote bag sample?
A: Once the design specifications are finalized, a structural sample typically takes 5–7 business days to complete. A full pre-production (PP) sample, including the logo printing and hardware installation, usually requires 10–14 business days.
If fabric color matching or pattern revisions are needed, each additional revision generally adds 2–3 business days to the sampling timeline.
Q2: Can you make a sample if I only have a design sketch or product rendering?
A: Yes. We regularly turn clients' hand-drawn sketches, AI renderings, and reference photos into physical prototypes.
Our team will reverse-engineer the dimensions, recommend the appropriate canvas weight, and fill in the structural details that are not shown in the artwork—such as determining whether the handle length is suitable for shoulder carrying and whether the interior pocket layout is practical and functional.
Q3: What's the difference between a structural sample and a pre-production (PP) sample?
A: A structural sample is used to verify the bag's shape, proportions, internal compartments, and overall structure. It does not include logo printing or finalized hardware.
A pre-production (PP) sample is produced after the structural sample has been approved. It incorporates the final logo artwork, approved hardware, and all finishing processes, serving as the approved reference sample for mass production. All bulk production must follow this signed-off sample.
Q4: How do you accurately match the fabric color and weight?
A: We provide numbered fabric swatches so clients can compare the colors in person under natural lighting.
For example, if a client requests a "gold" canvas, we'll typically offer four different shades—Bright Gold, Matte Gold, Classic Gold, and Brown Gold. Once the client confirms the preferred swatch number, we proceed with fabric sourcing and cutting, minimizing the risk of color discrepancies caused by different screen displays.
Q5: Can the sampling fee be credited or refunded after placing a bulk order?
A: In most cases, the sampling fee is paid upfront.
If the subsequent bulk order meets the minimum order quantity (MOQ), the sampling fee can usually be fully credited toward the production order or refunded, depending on the agreed project terms.
Q6: At what stage should the hardware and logo details be finalized?
A: These details should be confirmed during the structural sample stage. This includes:
The hardware finish (such as matte gold or brushed gold)
Logo size and placement
Zipper specifications
Bottom metal feet style
Once the PP sample has been approved, any changes may result in additional costs and production delays. Therefore, it's essential to finalize these details before moving into the pre-production sample stage.
Author


 Network Supported